You can customize many of MuseScore's default behaviors via the menu: Edit→Preferences....
The Preferences dialog has multiple tabs:

Reset All Preferences to Default will reset all preferences to the ones MuseScore had when you installed it.
Cancel will close the dialog without applying changes.
General

Here you can define:
- Your opening score
- The default folder to search for/save to scores, styles,templates, plugins, SoundFonts, and images
- Your auto save timing
- The languages of MuseScore (translations may be updated from here too)
- The style of your MuseScore windows and size of icons
- The windows to show at startup (Play Panel, Navigator, Start Center)
Note that language translation updates can also be done via the menu: Help→Resource Manager.
Canvas

Use Canvas to set your preferred color and wallpaper for the score background and paper.
Under Scroll Pages, you can choose whether to display pages of a multi-page score laid out in a horizontal row, or scrolling in a vertical column.
Under Miscellaneous, checking Draw antialiased (on by default) makes diagonal lines and edges of shapes look smoother (less jagged).Proximity for selecting elements controls the distance the mouse may be from an object and still act on it.Smaller numbers require more precision, making it harder to click on small objects.Larger numbers are less precise, making it harder not to click on nearby objects unintentionally.Choose a comfortable working value.
Note input

On this tab there are note input and MIDI remote control preferences. Here the following can be set:
- Enter notes via MIDI
- Enable playback on entering a note
- Its playback duration
- Color notes outside the usable pitch range
- MIDI Remote Control settings
Midi Remote Control allows you to enter or leave note input mode and also choose the duration for notes and rest directly from the MIDI keyboard as you enter notes into the score via MIDI, without having to use the computer mouse or keyboard at the same time.
The default setting for Midi Remote Control is 'off' with the checkbox blank, and all the option buttons below are grey.In order to set preferences it must be turned on with the MIDI keyboard connected.
To turn on Midi Remote Control click the checkbox,the current status of all Midi Remote Control Key settings is now indicated by the colored input option buttons:
-Green button is lit only if the MIDI key action is defined by the user.
-Red button is lit only during the preference setting process.
-By default no MIDI key actions are set and all buttons are unlit.
To enable a MIDI key operation: click the red button which lights up and stays lit until you press your chosen MIDI key for that operation and the green button is lit permanently. Once you have defined your key settings you can use the MIDI keyboard to control note input operations.You can verify your key settings by observing the MuseScore Note Input panel while pressing the MIDI keys.
To temporarily deactivate Midi Remote Control: click the Midi Remote Control checkbox, it is un-ticked and all MIDI input key action buttons are greyed.Your selections are always saved between MuseScore sessions so you can deactivate remote control at any time without losing your settings.
IMPORTANT, at the time of writing:-
1. The Clear option turns off all the green buttons for the current MuseScore session but all the user recorded MIDI key settings are retained and will be reloaded on the next session.
2. A MIDI key setting that is activated cannot afterwards be turned off and the green button will always remain lit but it can be overwritten with a different MIDI key by using the red button again.
3. Unfortunately, if the same MIDI key is used accidentally for two (or more) note inputs then both (or all) the associated green buttons stay lit but only one will work. You can fix this as in 2 above.
Score

Score preferences include
- Default instrument list files (two may be selected)
- Default style for score and parts
- Default zoom
I/O

Input/Output preferences enable you to set what device will be used for audio playback (e.g., built-in speakers, USB headset, wireless, etc.), whether to use a MIDI trigger (plugged-in keyboard), and whether to route audio output through JACK.
Import

These settings determine how files from other sources are imported:
- Using either the built in MuseScore style or a style you choose
- Guitar Pro and Overture character sets
- MusicXML layout options
- Shortest note in MIDI files
Export
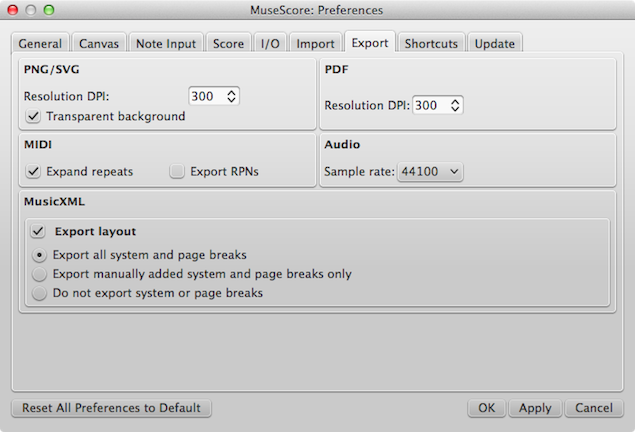
These settings determine how MuseScore files are exported:
- PNG/SVG image resolution (in DPI) and whether to use transparent background
- Whether to expand repeats in exported MIDI files
- Digital audio sample rate
- MP3 bitrate (as of MuseScore 2.1)
- Whether to export the layout and how to export system and page breaks to MusicXML
Shortcuts

Every action possible with MuseScore is listed, with the associated shortcut if it exists. To define a new shortcut, select an existing entry in the list and click Define... (or just double click the entry), then enter the new shortcut using up to four keys. You can also reset any shortcut in the list to its default value, or clear a shortcut you select. Shortcuts listed in preferences appear next to their associated commands in the menus.
Note: Some shortcuts, including default ones, may not work with some keyboards.
The list of shortcuts can be printed out or exported to other media (pdf etc.) using the Print button in the bottom right of the window.
Update

This sets whether MuseScore will check for updates at startup.
Updates may be checked manually in Help→Check for updates
Note input
MuseScore allows you to enter music notation in a number of ways, and to switch easily between different input devices and input modes.
After exiting the New Score Wizard, your new score will consist of a series of measures filled with measure rests:
![]()
As you enter notes in a measure, the measure rests are changed to appropriate rests to fill the remainder of the measure.

MuseScore allows for multiple rhythms to be entered on the same beat by using Voices

Basic note entry (Step-time)
This section introduces you to the basics of entering notes and rests from a computer keyboard . For specific details about percussion, see also Drum notation.
Step 1. Select a starting position
Select a starting position for note input by clicking on a note or rest, or selecting a measure, with the mouse. If you don't select a starting point, the cursor automatically defaults to the beginning of the score when you enter Note Input mode ("Step 2" below).
Step 2. Enter Note Input mode
To enter Note Input mode, use either of the following options:
- Click on the "N" button (on the extreme left of the Note Input toolbar).
- Press N on your computer keyboard.
To exit Note Input mode, use any of the following options:
- Press N.
- Press Esc.
- Click on the toolbar "N" button.
Step 3. Select a duration
Still in Note Input mode, select a note duration using either of the following:
- Click on a corresponding note icon in the Note Input toolbar (directly above the document window).
- Enter the keyboard shortcut for that duration (see below).
Note: If you need to enter a tuplet, see Tuplet.
Step 4. Enter the note or rest
- To enter a note pitch from A–G, simply click on the corresponding letter on your computer keyboard.
- To enter a rest, press 0 (zero).
This method of entry also works if you are not in Note Input mode—as long as you have a note/rest selected, or the score is newly-created (in which case note entry will default to the beginning).
Note: Note input in MuseScore overwrites existing notes or restsin a measure. If you need to insert notes you can make room for them by moving a section of the score using the copy and paste command. You can also insert new measures at any point (see Measure operations: Insert).
Input devices
In addition to the computer keyboard, you can also enter notes and rests using a mouse, MIDI keyboard or the Virtual Piano Keyboard.
Computer keyboard
This section expands on Basic note entry (above) and covers the full range of commands available for entering notes/rests from the computer keyboard.
Note duration
The shortcuts for selecting note duration are as follows:
- 1: 64th (hemidemisemiquaver)
- 2: 32nd (demisemiquaver)
- 3: 16th (semiquaver)
- 4: Eighth (quaver)
- 5: Quarter (crotchet)
- 6: Half (minim)
- 7: Whole (semibreve)
- 8: Double whole (breve)
- 9: Longa
- .: A period (dot) changes the selected duration into a dotted note/rest
Enter notes/rests
You can enter a note by typing the corresponding letter on your keyboard. Thus, typing C, D, E, F, G, A, B, C gives you:

Note: When you enter a note using the keyboard, MuseScore places it closest to the previous note entered (above or below).
To enter a rest, type "0" (zero). Thus, typing C D 0 E results in:

Note: The duration selected in the toolbar applies to both notes and rests.
If you want to entera dotted note, press . (period/full stop) after selecting the duration.
For example, typing 5 . C 4 D E F G A gives you:

Note: You will need to use more than one voice if the staff part is polyphonic.
Move notes up/down
To move a note up or down by a semitone:
- Press the ↑or ↓ arrow.
To move a note up or down diatonically:
- Press Alt+Shift+↑ or Alt+Shift+↓.
To move a note up or down by one octave:
- Press Ctrl+↑ (Mac: ⌘+↑) or Ctrl+↓ (Mac: ⌘+↓).
Add accidentals
When a note is moved up or down with an arrow key (see above), any accidental required is automatically generated by the program. Accidentals can also be added manually—seeAccidentals.
Chords
If you want to add a chord note above your previous entry:
- Press and hold Shift, then enter a note from A to G.
Thus, typing C, D, Shift + F, Shift + A, E, F results in:

To add a note at a specific interval above or below one or more notes:
- Ensure that one or more notes are selected;
- Use one of the following options:
- From the menu, select Notes→Add Interval... and chose an interval from the list;
- Press Alt+1-9 for intervals above (intervals below are also possible by adding relevant shortcuts to the list in Preferences).
Note: To create chords with notes of different durations, you will need to use more than one Voice.
Keyboard shortcuts
Here is a list of useful editing shortcuts available in Note Input mode:
- ↑ (Up): Increase the pitch of a note by a semitone (uses ♯).
- ↓ (Down): Decrease the pitch of a note by a semitone (uses ♭).
- Alt+1-9: Add interval (unison to ninth) above current note
- J: Change note up or down to enharmonic note (alters the spelling in both concert pitch and transposed modes). See Accidentals
- Ctrl+J (Mac Cmd+J): Change note up or down to enharmonic (alters the spelling only in the current mode). See Accidentals
- Alt+Shift+↑: Increase the pitch of a note using key signature
- Alt+Shift+↓: Decrease the pitch of a note using key signature
- R: Repeat the last entered note
- Q: Halve the duration of the last entered note
- W: Double the duration of the last entered note
- Shift+Q (as of version 2.1): Decrease duration by a dot (for example, a dotted quarter note/crotchet becomes a quarter note/crotchet and a quarter note/crotchet becomes a dotted eighth note/quaver).
- Shift+W (as of version 2.1): Increase duration by a dot (for example an eighth note/quaver becomes a dotted eighth note/quaver and a dotted eighth note/quaver becomes a quarter note/crotchet).
- Backspace: Undo last entered note
- Shift+←: Exchange last entered note with the note before it (repeat to keep moving note earlier)
- Shift+→: Exchange note moved with Shift+← with the note that follows it
- X: Flip direction of note stem (can be reset to Auto position in Inspector)
- Shift+X: Move note head to opposite side of stem (can be reset to Auto position in Inspector)
Mouse
It's easy to enter notes with the mouse, but it is not the fastest way to enter lots of notes.
Just select the duration from the toolbar and click on the score to add the pitch. If you hover the cursor over the score in Note Input Mode it will show you a preview of the note or rest you are about to add.
MIDI keyboard
You can also insert pitches using a MIDI keyboard.
- Connect your MIDI keyboard to the computer and switch the former on
- Start MuseScore (this must be done after the keyboard is switched on)
- Create a new score
- Click the rest (selecting it) in measure 1 to indicate where you want note input to begin
- Press N to enter
note input mode - Select a note duration such as 5 for quarter notes (crotchets), as described above
- Press a note on your MIDI keyboard.
The pitch should be added to your score.
Note: The MIDI keyboard enters one note or chord at a time. This mode of note input (often called "step-time entry") is fast and reliable. Beginning with version 2.1 MuseScore introduced a limited real time entry mode, in which the musican plays a passage and MuseScore tries to produce the notation.
If you have multiple MIDI devices connected to your computer, you may need to inform MuseScore which is the MIDI keyboard. Go to Edit→Preferences... (Mac: MuseScore→Preferences...). In the preferences dialog, click on the I/O tab and select your device under the section labeled "PortAudio".
Virtual Piano Keyboard
You can also input notes using the on-screen piano keyboard.
- To toggle the display on and off: Press P (or select View→Piano).
- To resize the keyboard: Hold down Ctrl (Mac: Cmd) and move the mouse scroll wheel up/down.
The method of note entry is similar to that for a midi keyboard. First, ensure that you are in note input mode. To enter a single note, simply click on the appropriate piano key. To enter a chord, make sure that a note in the score is selected, press and hold Shift, then click on a piano key (in versions before 2.1, use Ctrl (Mac: Cmd)). Repeat as required.
Input modes
In addition to the existing Step-time and Repitch modes, three more input modes have been added in MuseScore 2.1 (see links below). All can be accessed by clicking the smallarrow next to the "N" button on the left of the Note Input toolbar.

- Step-time (default): The default mode of note entry. See Basic note entry (above).
- Repitch: Replace pitches without changing rhythms.
- Rhythm: Enter durations with a single click or keypress.
- Real-time (automatic): Perform the piece at a fixed tempo indicated by a metronome beat.
- Real-time (manual): Perform the piece while tapping a key or pedal to set the beat.
Coloring of notes out of an instrument's range
Notes within the playable range of an instrument or voice part appear black, while those extending beyond the normal range of an instrument are marked red. For some instruments, the range depends on the skill of the musician. For these instruments, notes outside the range of an early amateur appear dark yellow, and notes outside the typical range of a professional appear red.

The colors are informational and appear on the computer screen, but not on printed copies. You can disable note colors from the menu: select Edit→Preferences... (Mac: MuseScore→Preferences...), click on the "Note Input" tab, and unmark "Color notes outside of usable pitch range".
Small notes/small noteheads
- Select the note(s) you want in small size.
- Check the "Small" checkbox in the Inspector. The one in the
Notesection is used to only change the size of the individual notehead; the one in theChordsection will change the note head, stem, beam, and flag sizes all together.
By default, the small size is 70% of the normal size. You can change that setting in Style → General→Sizes.
Change notes or rests already entered
Change duration
To change the length of a single note or rest:
- Make sure you are not in note input mode (press Esc to exit) and have no other notes selected.
- Click on the note or rest and use the duration shortcuts listed above, or the duration icons in the toolbar, to change it to the duration of your choice.
Increasing the duration will overwrite the notes or rests that follow it; decreasing the duration will add rests between it and the notes or rests following.
For example, to change three sixteenth rests into a single dotted eighth rest:
- Click on the first sixteenth rest.
- Hit 4 to turn it into an eighth rest.
- Hit . to turn it into a dotted eighth rest.
As the duration increases, it overwrites the other two sixteenth rests following it.
Change pitch
To change the pitch of a single note:
- Make sure that you're not in note input mode and that you have no other notes selected.
- Select the desired note and use any of the following methods:
- Drag the notehead up or down with the mouse;
- Press the the keyboard arrows: ↑ (Up) or ↓ (down);
- Type a new note letter name (A…G). Use Ctrl+↓ or Ctrl+↑ to correct the octave, if necessary (Mac: Cmd+↓ or Cmd+↑).
To change the enharmonic spelling of a note, select it and use the J command. For more information, see Accidentals.
To change the pitches of a passage of music by a constant interval, you can use Transposition.
To change the pitches of a passage of music to a different melody, while keeping the rhythm unchanged, use Re-pitch mode.
If your score contains a lot of misspelled accidentals, you might try the Respell Pitches command (see Accidentals: Respell pitches).
Change rest to note and vice versa
To change a rest to a note of the same duration:
- Make sure you are not in note input mode (press Esc to exit).
- Select the rest.
- Enter the desired pitch by entering a note letter, A–G.
To change a note to a rest of the same duration:
- Make sure you are not in note input mode (press Esc to exit).
- Select the note.
- Press 0 (Zero).
Note properties
- To adjust the horizontal position of a note/chord: see Offsetting notes.
- To edit note properties in general (spacing, offset, size, color, notehead direction, playback etc.): see Inspector and object properties.
- To adjust the layout of all notes in the score: see Layout and formatting, especially the sections about notes, accidentals and tuplets.
Selection modes
Objects in the score—such as notes, measures, articulations etc.—can be selected in several ways: (1) singly, (2) as a continuous range, or (3) as a list.
Select a single object
Most score objects can be selected by simply clicking on them in "normal" (i.e. not note-input) mode.
Select a single note
- Make sure you are not in note input mode
- Click on a note.
Note: Selecting a single note then copying and pasting it, will only copy and paste the pitch—not duration or other properties (such as stemless). To copy the entire note, including all properties, you need to hold down Shift—as for chord selection (below).
Select a chord
- Make sure you are not in note input mode
- Press and hold Shift, then click on a note in the chord.
Select a single measure
- Click on a blank space within the measure.
Note: To select a range of consecutive measures, see shift + click selection (below).
Select a continuous range of objects
There are several ways to select a continuous range of notes, chords or measures:
1. Shift selection
- Make sure you are not in note entry mode
- Select the first note, chord, rest or measure in the range. You can extend the selection up or down to adjacent staves, if needed, using Shift+↑ or ↓.
- Then choose one of the following options:
- To advance the selection one chord at a time to the right: Press Shift+→.
- To advance the selection one chord at a time to the left:Press Shift+←.
- To advance the selection one measure at a time to the right: Press Shift+Ctrl+→ (Mac: Shift+Cmd+→).
- To advance the selection one measure at a time to the left: Press Shift+Ctrl+← (Mac: Shift+Cmd+←).
- To advance the selection to the beginning of the line: Press Shift+Home (Mac:Shift+Fn+←).
- To advance the selection to the end of the line: Press Shift+End (Mac:Shift+Fn+→).
- To extend the selection to the beginning of the score: Press Shift+Ctrl+Home (Mac: Shift+Cmd+Fn+←).
- To extend the selection to the end of the score: Press Shift+Ctrl+End (Mac: Shift+Cmd+Fn+→).
2. Shift + Click selection
To select a range of notes or rests:
- Make sure you are not in note entry mode
- Click on the first note or rest in the range
- Press and hold Shift
- Click on the last desired note or rest.
Note: The final selected element can be in the same staff or in staffs above or below the initial note/rest. All selected elements will be enclosed in a blue rectangle, includingassociated lines and articulations (but not voltas). You can repeat the operation to extend the selected range as required.
To select a range of measures:
- Click on a blank space in the first desired measure
- Hold down Shift, then click on a space in the last measure of the desired range.
Note: As with selecting notes, the range can be extended vertically as well as horizontally.
3. Drag selection
This method can be used to select notes or rests, or, independently, to select non-note symbols such as staccato dots, lyrics etc.:
- Press and hold Shift, then drag the cursor across the desired range.
4. Select All
This method selects the whole musical score including notes, rests and associated elements. Use one of the following options:
- Press Ctrl+A (Mac: Cmd+A).
- From the menu bar, chose Edit → Select All.
5. Select section
This method is used to select a section—a region of the score starting and/or ending with a section break:
- Click on an empty space in a measure in the section.
- From the menu bar, chose Edit → Select Section.
Note: See Copy and paste: Selection filter to disable certain types of elements from being selected in a range selection.
Select a list of objects
To select a list (or discontinuous range) of score elements:
- Select (click on) the first element.
- Hold down Ctrl (Mac: Cmd) while selecting (clicking on) the desired additional elements.
Note: This method cannot be used to select measures. Use single or range selection instead.
Select all similar
To select all elements of a specific type (e.g., all barlines, all text elements, all staccato markings):
- Select an element
- Right click → Select
Several options are available:
- All Similar Elements: Selects all elements in the score similar to the chosen object
- All Similar Elements in Same Staff: Selects all elements in the same staff similar to the chosen object
- All Similar Elements in Range Selection: only applies if a range has been selected. Selects all elements in the range similar to the chosen object
- More...: opens a dialog that lets you fine-tune more options. For example, if you have a notehead selected, the dialog will look something like this (as of version 2.1—previous versions had fewer options):

Select
- Same notehead: In this example, only noteheads of the same group will be selected;
- Same pitch: Only noteheads of the same pitch will be selected;
- Same type: All noteheads (of any group) will be selected;
- Same duration: Only noteheads of same duration will be selected;
- Same note name: Noteheads of that name in all octaves will be selected;
- Same staff: Only noteheads on the same staff will be selected.
Action
- Replace selection: The default option: starts the selection from scratch;
- Add to selection:Keeps everything you have already selected, and adds the current selection to it;
- Search in selection:
- Subtract from selection: Keep everything you have already selected, but takes away the current selection.
What selections are useful for
Voices
A voice is a musical line or part which can have its own rhythm independently of other voices on the same staff. Voices are sometimes called "layers" in other notation software.
You can have up to 4 voices on each staff line. In a polyphonic measure, voice 1 usually takes the up-stem notes and voice 2 takes the down-stem notes.

Note: The feature called "Voices" should not be confused with "vocal staves," which can be added from the Instruments dialog (accessed by pressing I). When creating a closed SATB score, use Voices 1 and 2 for Soprano and Alto parts on the top staff, and use Voices 1 and 2 on the bottom staff for Tenor and Bass parts—do not use Voices 3 and 4 for Tenor and Bass.
When to use voices
- If you need stems pointing in opposite directions within a chord, on a single staff.
- If you need notes of different durations within a single staff, played simultaneously.
How to enter notes in different voices
The following instructions show you how to notate a passage of music in two voices:
Enter voice 1 notes first: Make sure you are in note input mode :the Voice 1 button becomes highlighted in blue in the toolbar. Enter the notes in the top voice first. When inputting, some notes may have down-stems, but these will flip automatically when the second voice is added.
The following excerpt shows a treble staff with just the voice 1 notes entered:

Move cursor back to start of section: When you have finished entering a section of voice 1 notes, press the ← key repeatedly to move the cursor, note-by-note, back to the first note of the section; or alternatively use Ctrl+← (Mac:Cmd+←) to move the cursor back one measure at a time. Or else you can simply exit note input mode (press Esc) and click directly on the first note.
Enter voice 2 notes: Make sure you are in note-input mode and that the voice 1 note at the beginning of the section is selected. Click on the "Voice 2" button

The following image shows the above example after the addition of voice 2 notes:

Deleting and hiding rests
While the rests of voices 2, 3, and 4 can be deleted, rests in voice 1 are permanent. However, they can be hidden, if required, by making them invisible. To hide a rest, select it and press V; or uncheck the "Visible" checkbox in the Inspector (see also Visibility options).
Exchange voices of notes
To swap the notes between any two voices:
- Select a range of measures;
- From the Menu bar, select Edit → Voices;
- Exchange any two voices from the list.
Notes: (a) The selection can encompass content of any voice, but only two will be processed at once. (b) If you select a partial measure the operation will still apply to the whole measure.
Move notes to another voice (without swapping)
You can also move notes from one voice to another (without note-swapping):
- Ensure you are not in note input mode.
- Select one or more noteheads (in any voice).
- Click on the destination voice in the Note Input toolbar or use the shortcut Ctrl+Alt+1–4 (Mac: Cmd+Option+1-4).
Note: For a successful move, the following conditions should be met:
- The chord(s) in the destination voice must be the same duration as the note(s) to be moved there.
- There is enough rest duration in the destination voice to accommodate the new notes.
- The note(s) cannot be connected by a tie.